
How to Propagate Hydrangeas
I’ve been on a bit of a propagation kick lately. Why? Well, it’s a great way to save money and I love learning new skills. Today, I want to share with you how to propagate hydrangeas.
Mind you, I’m new at this but the process is quite straightforward. What have we got to lose, right? We get more plants at no cost. And shrubs, in this case, which tend to be pretty pricey.
Now, before we get into the technique, I want to mention something that is really important. There are many hydrangea varieties that are patented, especially the newer ones. This means it is not legal to propagate them! But if you’re wanting to propagate an old variety (such as grandma’s old hydrangea) that is perfectly acceptable. If you know the name of a variety, I would recommend doing a web search to see if it’s still patented. Plant breeders spend a LOT of money perfecting new varieties that will do well in our gardens. It’s important that we respect that.
Moving on, how did I learn to propagate plants? Well, I enjoy watching British gardening programs and have noticed how they often talk about how easy it is to take cuttings. It’s a great way to be thrifty and either share plants with others or add them to your own landscape.
Refer to step #1 for the list of supplies you’ll need.
To propagate hydrangeas, you start with “softwood cuttings.” This is new growth that doesn’t have a flower bud, so you have to study them. Choose cuttings that have a few sets of leaves on them. As soon as you cut them from the mother plant, place them in Ziploc-style bag that seals, so the cuttings won’t lose moisture before you’re ready to prepare them. Now follow the steps below.
 | 1. Propagation Supplies | – Ziploc-style bag – Planting container filled with seed-starting mix or potting soil – Small, sharp knife – Cutting board – Chopstick or dibber-style tool for making planting hole – Rooting hormone Cuttings |
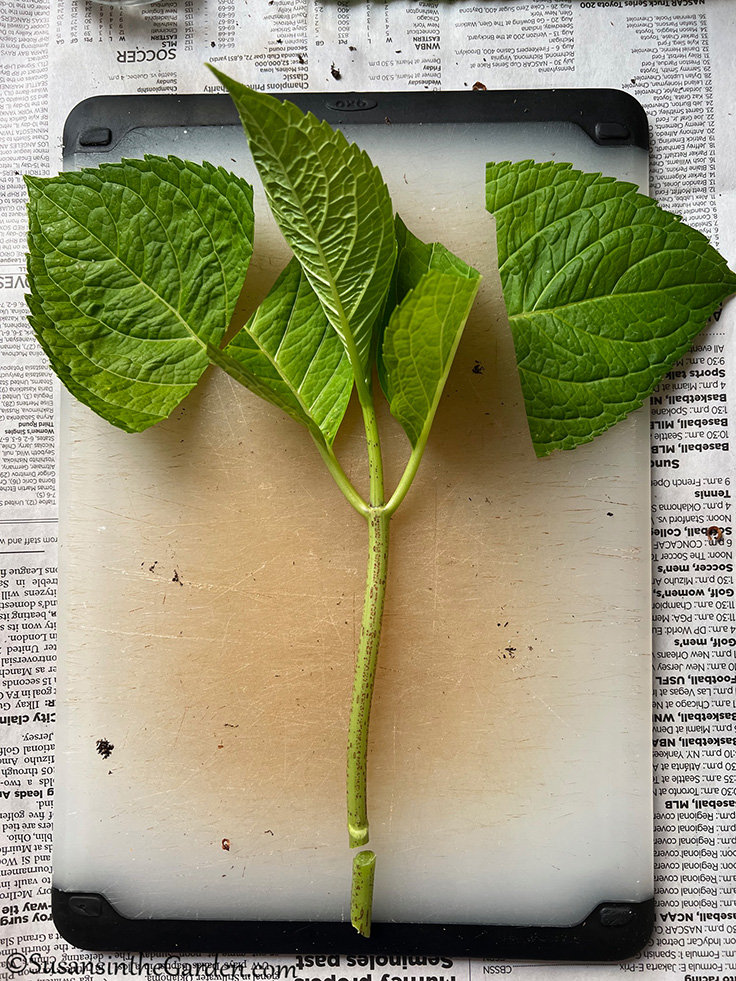
 | 2. Trim Off Lower End | Using a sharp knife, cut off lowest end of cutting, directly below a pair of leaves. |
 | 3. Remove Some Leaves | Remove all but the top 2 pairs of leaves. |
 | 4. Cut the 2 Largest Remaining Leaves into Half to Reduce Moisture Loss | Notice how I have removed 2 pairs of leaves and then, using my knife, I cut the 2 largest remaining leaves in half. The purpose of this step is to reduce moisture loss from the cutting. |
 | 5. Dip the Lower End of Cutting into the Rooting Hormone and Plant in Container | Place a small amount of rooting hormone into a small cup or jar lid, rather than dipping the cutting directly into the original container of rooting hormone. That will contaminate the remaining amount of the rooting hormone. Dip lower end of cutting into hormone. Use your chopstick or small dibber to create the cylindrical planting hole in planting container. Carefully insert cutting into that hole, while avoiding knocking off the hormone, firm soil around the cutting’s main stem. |
 | 6. Repeat Process With Remaining Cuttings | Repeat steps 2-5 until you have run out of cuttings. Water the container well and then let it drain for a while. |
 | 7. Carefully slide your planted propagation container into a clear bag. | Carefully place your planted cuttings into a Ziploc-style plastic bag. Seal the bag and place it in an area that is away from direct sunlight. (Another option is to place a clear plastic over the pot and secure it onto the pot to promote high humidity.) About once a week, open (or remove) the bag to allow excess moisture to dissipate, then put bag back in place. This will reduce the chances of the development of mold. |
The cuttings can take about 2-4 weeks to develop roots. You can tell if they’re rooted by gently pulling on each cutting. If there is some resistance, they have new roots! At that point, remove the bag and place the pot in an area with filtered light. When you notice roots coming out of the bottom of the pot, transplant them into a slightly larger pot. I wish you great success!